4. Combat
Now that you've got a basic way to design the world your game will take place in, it's time to make travel a little more interesting.Again, most avid gamers will recognize this as "random encounters". There's multiple ways of implementing combat in your game, some examples:
* Random encounters - (almost any 2d rpg) you walk around in world areas and dungeons and suddenly... "A wild Pikachu appears", then combat starts.
* Static creatures - (FF Mystic quest) any non world area may have creatures standing around as actors, talk to them to start combat. This allows the player to avoid combat if he chooses.
* A combination of the 2 above. (random in world, static in dungeons)
* Active creatures - (Lufia) instead of standing around, monsters move and can walk towards the player to attack them. This would require some scripting.
* Active creatures, and active player attacks. (Secret of mana, zelda, diablo) Live action - the player can attack creatures without being thrown into a turn based combat screen. This would also require some scripting, which we'll not cover in this guide at this time.
For now, let's look at the random encounters.
Static creatures are fairly easy to add and we'll cover that soon as well.
If you haven't done so yet, add a map that will serve as your "world" map. You should know how to do so by now.
Make sure you add a transfer event to go there from your town, and back from there into your town.

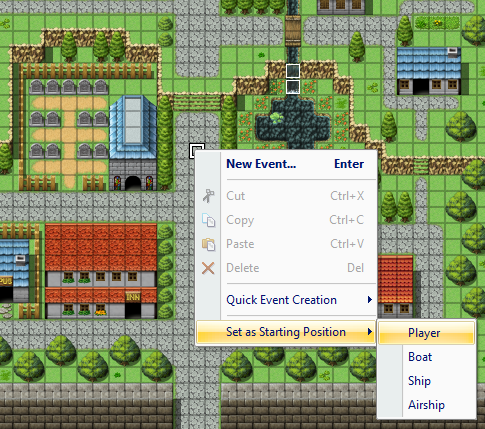
Next, in the map box, right click on the new map and select "map properties".
On the right you right click (or double click) in the "encounters" box and select Slime*2. By default the troop will then appear across the whole map. Let's set it to appear in a specific region only. If you wish the monsters to appear more often, raise the weight from 10 to a higher number.
Now would be a good time to test your newly added monster encounter.
Seems to work right?
Let's cover that static monster next.
Go to your town map and open the "event editing mode"(F6).
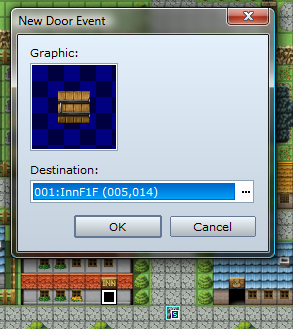
 Right click on the map and select "New event".
Double click the "graphic" and select something from "Monster2" the blue slime for example.
Double click the first line of "contents" on the right and select from tab-3 the "battle processing" button.
Then, select the "Slime*2" again.
Ensure the "trigger" (in the bottom) is "action button". This will ensure if you press space next to the monster, you will initiate the attack. (Also see below how to hide the monster after defeating it)
Time for another test?
Using these 2 combat encounter techniques you'll be able to add some basic excitement to your game.
(You have to keep in mind that the story will obviously be the most important part)
5. Story
As just stated, the story is important, but... how to tell a story in a game?NPC interaction will get you a long way, your character will move through the world you create and talk to NPCs to gain quests, new party members, and be sent off to rescue the kingdom or world from mortal peril.
NPC Types.
* The nobody: One or two lines of text - if any.
* Chatterbox: The NPC that wants to tell you a ton of things, and has you smacking space because you don't care about it. Much like the nobody, these guys are pretty straightforward.
* Innkeepers and vendors: You already know how to make an innkeeper, we'll get to vendors later.
* Quest NPCs: NPCs that activate a condition in order to progress through the game
* Party members: Most RPGs don't let you start out with a full party, you find these along the way, and after meeting a certain trigger they will join or leave your party at a later time.
* Static monster: Monsters can talk as well - certain bosses or villains for example will have more dialog than plain mobs. Explaining the evil master plan as you sharpen your sword, or taunting you at your inability to prevent the next event. (You already know how to make a static monster, see above)

In order to create a NPC with some dialog, you once again create an event (F6 mode again).
Right click somewhere in town and first select a proper graphic. (Much like creating a static monster, you create a static NPC)
Next, Add a new event content (right click, insert) and select "Show Text" from tab 1.
You can then select a face graphic to show the actor you're talking to, or leave it blank for generic NPC or the narrator.
Fill in the text you wish to show.
I put up a dog here, so I added the text "Woof".
You now have a generic "nobody" NPC.
To create a chatterbox, simply insert extra text lines. (or select the batch entry checkbox)
Note: To simulate chat between your character(s) and the NPC in question, simply set the character portrait, or prefix the text with the name of the NPC you want to indicate is saying the text.
If you wish to give the player some interaction, you can insert the "show choices" message.
When you add the choice, you'll notice the contents branches into a "when yes" and "when no", under each of these choices you can then add more text, or special actions, such as giving the player an item, or adding/removing a party member.
If you wish to create a false choice to which the player MUST agree, even though he's given a choice of yes and no, you can create a so called "loop" (also on tab 1).
Note that after adding a loop, you have to add a "break loop" in one of the choices, or the player will be stuck with the NPC.
Example:
@> Loop
@> Text: 'Actor1', 1, Normal, Bottom
:: Could I tag along?
@> Show Choices: Yes, No
: When [Yes]
@> Text: 'Actor1', 1, Normal, Bottom
:: Thank you, let's go!
@>Break Loop
@>
: When [No]
@> Text: 'Actor1', 1, Normal, Bottom
:: You can't say No to me!
@>
: Branch End
@>
: Repeat above
@> Change party member: add [Natalie]
@>
@> Text: 'Actor1', 1, Normal, Bottom
:: Could I tag along?
@> Show Choices: Yes, No
: When [Yes]
@> Text: 'Actor1', 1, Normal, Bottom
:: Thank you, let's go!
@>Break Loop
@>
: When [No]
@> Text: 'Actor1', 1, Normal, Bottom
:: You can't say No to me!
@>
: Branch End
@>
: Repeat above
@> Change party member: add [Natalie]
@>
Or transferring the player to another map.
And many more things.
If you used the above "add party member" example, you'll notice the NPC will still be seen standing there, after "bringing her along". This is obviously somewhat counter intuitive. So, let's add a switch.
6. Switches
Switches control events, such as you pulled the magic sword from the stone, defeated the crypt fiend, talked to the dog, entered the graveyard, and so on. Using switches you can control the game progression and make new areas or party members available for your hero to discover.Keep in mind, adding a LOT of switches will quickly make your RPG's script more complex for you to manage, so it's recommended to give clear and easy to understand names to each of your switches, so even if you come back and start editing again a month or two later, you'll know what the switch does, and why you added it.
For example:
* Crypt Boss Slain
* Party Natalie Available
* Party Natalie Added

Lets alter the above script by adding another NPC to the town, which makes the other NPC "available", and then change her dialog so you don't make her available a second time. After all, if you pull one switch, you reset another.
The basics would be:
* You enter town (or talk to a certain npc), raise switch "Natalie available".
* Natalie should now be visible to talk to, and get added to your party.
* After adding her, the initial switch that set her as "available" should now no longer be possible to re-set, otherwise you'll be able to see her in two places at the same time.
To make this, we edit the above existing event and click the "..." button next to the "Conditions-Switch".
Let's name the switches and press OK:
* 0001: Natalie Available
* 0002: Natalie Added to Party
Next, we set the condition switch 0001: Natalie Available to the above script which allows you to add her to your party.
And, to the bottom of the script we insert two new script lines:
@> Control Switches (first tab, game progression): [0001:Natalie Available] = OFF
@> Control Switches (first tab, game progression): [0001:Natalie Added to Party] = ON
@> Control Switches (first tab, game progression): [0001:Natalie Added to Party] = ON
The second script line will be used by the NPC or event that makes her available.
To ensure she's made available only once we insert a "flow control -> conditional branch (Tab 1)".
In the dialog that follows we have it check the switch "0002: Natalie Added to Party" is OFF, in the first line of the branch.
(In the "else" statement, you could add a different response, such as "Oh hi Natalie" - to indicate the NPC recognizes she's in your party).
There is however a much easier way to programming an "add npc" event.
It just takes 2 simple steps. (You can still raise the "natalie available" switch to make the event show up in the first place)
The first step, is to create the event and have the event respond on the player talking to the npc as usual. After adding the new party member however, you can set the "Self Switch A" on the event, instead of using event "0002: Natalie Added to Party". Then on the event, add a second event page (see the buttons at the top) and on this second event page just add a check for "Self Switch A is ON". That's it.
You can make the second event page as fancy as you like, for example by adding a brother or sister to the npc to take their place and talk to the player, or a grass pile, or even a sign post saying "I've gone on an adventure.". Be creative.
To be continued.